Friday, April 20, 2012

Chicken with Broccoli Rabe and White Beans


I started eating broccoli rabe a few years ago and it's now one of my favorite vegetables. I don't find it as bitter as some describe it and enjoy the stalks far more than those on regular broccoli. Pairing broccoli rabe with cannellini beans is always the start of something good to eat, so when I saw this recipe at a weekly Weight Watcher meeting, I decided to make it to serve over pasta.


Adapted from WW Weekly, March 11-17, 2012
Servings 4 (6 PP)
1 1/2 tbs all purpose flour
1/2 tsp Kosher salt
1/4 tsp freshly ground black pepper
12 oz uncooked boneless, skinless chicken breasts, cut in large chunks
2 tsp extra-virgin olive oil
1 cup fat free, reduced sodium chicken broth
1 tbs minced garlic
1/4 tsp crushed red pepper flakes
8 oz uncooked broccoli rabe or broccoli, coarsely chopped (about 6 cups)
15 oz canned cannellini beans, rinsed and drained
1 tbs fresh lemon juice
1/2 tsp grated lemon zest
1/8 tsp salt

On a plate, combine flour, salt, and pepper; add chicken and turn to coat. Heat oil in large nonstick skillet over medium high heat. Add chicken and cook, turning as needed, until browned (about 6 minutes). Remove to plate. Add broth, garlic, and red pepper flakes to same skillet and bring to a boil over high heat, scraping up browned bits with a wooden spoon. Add broccoli rabe, cover, and cook over medium high heat until crisp tender, about 5 minutes. Stir in beans; cover, and cook about 2 minutes more. Uncover and mash some beans to thicken sauce slightly. Stir in chicken and cook until heated through. Season with lemon juice, zest, and salt. Yields 4 one-cup servings.
**********************
TASTE NOTES
This would be a fine dinner just as described above, but I served it over a cup of pasta and it was Sunday dinner worthy. Don't leave out the lemon because it really makes the broccoli rabe pop. Leaving the chicken in large chunks ensures that it won't dry out. My only misstep was that I determined to try whole wheat pasta (again) for health reasons. I've tried just about all that are on the market and the verdict is always the same: yuck! I'd rather eat half a cup of regular pasta than a pound of whole wheat.

Tuesday, April 17, 2012

Roasted Pork Tenderloin with Spring Vegetables

I'm sorry that there's no photo of this dish--my camera was sick--which is a shame since it was so colorful.

Pork tenderloins are not only economical, they are delicious and virtually fat free. It's one of the staples that I am rarely without. This preparation is from WW's Points Plus Cookbook, but you don't have to tell anyone that it's part of a healthy approach to eating.

Serves 4
nonstick spray
1 lb pork tenderloin, trimmed
1 tbs chopped fresh chives
3/4 tsp salt
1 (9 oz) pkg frozen artichoke hearts, thawed
1 lb small red potatoes, cut into quarters
1/2 lb asparagus, trimmed
1 cup baby carrots
2 tsp olive oil
1/4 tsp black pepper

Preheat oven to 475 degrees. Spray a large, shallow roasting pan with nonstick spray. Press chives into both sides of pork. Spray large skillet with nonstick spray and set over medium high heat. Add pork and cook until browned on both sides.

Transfer pork to roasting pan. Combine artichokes, potatoes, asparagus, carrots, oil, salt, and pepper. Toss to coat, then spread around the pork. Roast 25 minutes (until pork is cooked to 160 degrees). Let pork stand 5 minutes before slicing it into 12 portions. Serve with vegetables.

N.I. per serving:  293 cal, 6g fat, 31 g carb, 7 g fiber, 28 g protein; 7 points plus
*******************************
TASTE NOTES
This was a delicious and filling dinner with relatively low points. I've never used frozen artichoke hearts before and they were wonderful! I used the entire bunch of asparagus and the combination of  roasted vegetables with the potatoes and pork was quite satisfying. Even "Mr. Gravy" didn't seem to mind that there was no sauce. The pork was moist and flavorful--loved the chives--and I look forward to making this again soon.

Friday, April 13, 2012

Individual Chocolate Souffles


I didn't grow up in a house where dessert was served after dinner. That is not to say that cookies and milk or some other sweet wasn't available for evening snacking. Of course, as we age, we are wise to rethink what we eat, particularly in the evening hours, but I do look forward to a cup of tea or a glass of fat free milk and a small snack each evening. While a Fiber One brownie often fills the bill--they actually taste pretty good--nothing beats something homemade. These individual chocolate souffles fit very nicely into a balanced eating plan and are very easy to whip up just before you eat them. The recipe can be doubled or tripled to serve guests and they make a lovely presentation.


Servings - 2 (3PP)
(from WW Weekly, March 4-10, 2012)
2 sprays cooking spray
1 tbs unsweetened cocoa
1 tbs all purpose flour
3 tbs granulated sugar, divided
3 tbs low-fat chocolate milk
1 large egg white
1/2 tsp powdered sugar

Preheat oven to 350 degrees. Coat two 6 oz ramekins with cooking spray.  In a small saucepan, whisk together the cocoa, flour, and 2 tbs granulated sugar. Set over medium heat and add chocolate milk, stirring constantly until smooth (about 2 minutes). Remove from heat and cool 5 minutes. In a medium bowl, whisk the egg white until soft peaks start to form. Slowly add remaining tablespoon of granulated sugar and continue beating until soft peaks are formed. Fold cooled chocolate mixture into egg whites a little at a time until no white streaks appear. Pour batter into prepared ramekins and bake until set and top looks slightly dry, 14-16 minutes. Do NOT open oven until souffles are done or the cold air will cause them to sink. Dust with powdered sugar and serve warm.
*******************
TASTE NOTES
I've made souffles before, some of which have fallen after I took them out of the oven. Not so with these. They were quite impressive for being so quick and easy and very chocolatey and satisfying. I wished I had some raspberries as I would have made a quick puree to serve alongside. I will be keeping this recipe on "speed dial."

Thursday, April 12, 2012

TAST Week 15: Stem Stitch

I'm the first to admit that my spacial relations are horrendous. I'm used to doing things differently as an ambidextrous lefty, but embroidery really tests my mettle. I've used stem stitch before, but have never felt confident about the results. I revisited Sharon's explanation, consulted Montano's stitch tool, which has special directions for lefties, but still was not pleased with the results. I then turned to my copy of Yvette Stanton's The Left-handed Embroiderer's Companion and realized I had not looked at her directions before. Instead of the slanted stitch that most instructions call for, Stanton has you bring the needle out on the line, then insert the needle a short distance to the left and pull it through except for a little "loop" sitting above the line. She then directs you to bring the needle out on the line below this "loop" and halfway along the space. Finally, you pull the needle through and tighten the thread and voila! I finally produced a very good looking stem stitch.  I used a very thick cotton yarn, added some detached chain leaves, then used a 7 mm silk ribbon to make a 5-petaled flower. Stanton even has directions for how to turn a corner with this method. Now I have to practice my curved line stem stitch. 

Tuesday, April 10, 2012

Mini Cherry Cheesecakes

When I saw these in the weekly WW flyer, I made a note to try them after I'd been back on program a few weeks. I bought the ingredients and promptly forgot about them with the result that the reduced fat cream cheese I'd bought went bad. I'm mentioning this because I substituted all fat free cream cheese which resulted in a different texture (note  the somewhat messy cheesecake in the forefront). Nevertheless, this was a successful recipe and one that I will make again with the correct ingredients.

12 servings (3 points plus each)
3/4 cups graham cracker crumbs
2 tbs light butter, melted
2/3 cup lowfat cream cheese (12 tbs)
6 tbs fat free cream cheese
2 egg whites
1 1/2 tsp vanilla
1/2 cup sugar
3 tbs fresh lemon juice
3/4 cup Comstack lite cherry pie filling

Preheat oven to 375 degrees. Place 12 cupcake liners in pan.
Melt butter, then mix with graham cracker crumbs. Spoon 1 tbs of mixture into each liner and press down with back of spoon. Use an electric mixer to beat the cream cheeses, egg whites, vanilla, lemon juice and sugar until completely smooth. Pour evenly into 12 liners (the mixture will be thin) and bake for 15 minutes. Cool completely, then divide cherry pie filling evenly over the mini cheesecakes. Refrigerate.
***********************************
TASTE NOTES
Despite my substitution, these were really good. Be forewarned that the texture will not be the same as regular cheesecake (nor will your hips grow as they would with regular cheesecake). I enjoyed one of these treats with a glass of milk or a cup of tea (DSO enjoyed them two at a time) and, as I noted, I will be making them again.


Saturday, April 7, 2012

TAST: The Lost Weeks


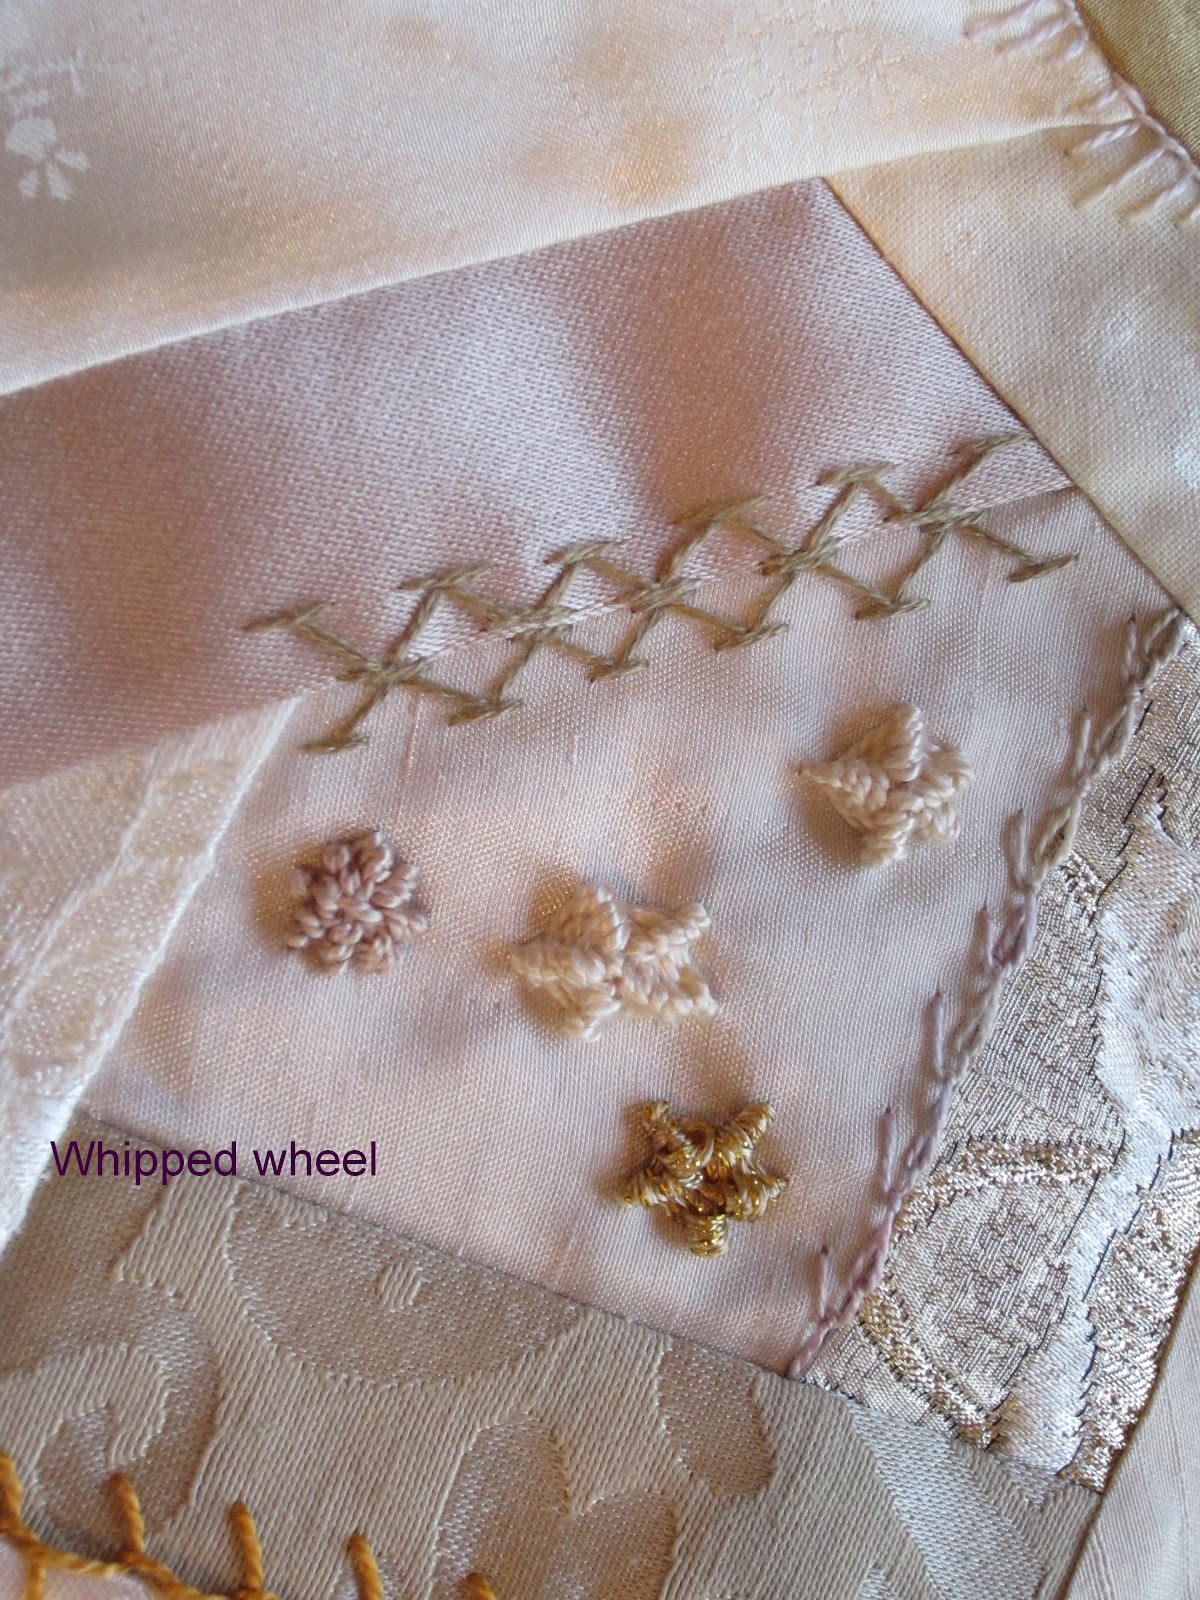
Although I've been busy trying to finish a year-long crazy quilting project, I have been keeping up with each week's TAST (Take a Stitch Tuesday) challenge. Unfortunately, my digital camera broke a few weeks ago and I just replaced it last weekend and now feel confident enough to actually use it. Since I last posted my work on TAST, we've had 4 new stitches and a catch up week. Week 10 was running stitch, one I haven't really used extensively in my crazy quilting. Week 11 was whipped wheel. It took a few false starts and stops, but I finally "got" this one and used it as filler for my bottom of the sea blocks. Week 12 was barred chain and alternating barred chain and I confess I had to do a major online search until I found a really good tutorial. Being left-handed is challenging and despite having several embroidery books designed for left-handers, I found the explanations tricky. I do like the barred chain stitch, though, and can see myself using it for any number of motifs in the future. Week 13, Sharon kindly offered a catch up week (she's very receptive to her students). That brings us up-to-date with week 14's stitch, the satin stitch. I've used this one before, but will readily admit that I need lots more practice. I decided to use satin stitch to make a spider for my beaded web.  It's far from perfect (the eyes and antenna make my spider seem a bit deformed), but I hope to find more opportunities to use this stitch in the future. So, there you have it. Ready for the next challenge. The examples of each stitch detailed above follow.


Friday, April 6, 2012

Bacon, Egg, and Cheese Cups

Most weekdays breakfast consists of a Greek yogurt and fruit or a very quick saute of vegetables to which I add an egg and an egg white for a frittata lite. On the weekends, I like to glam it up a bit, so I decided to make these simple bacon, egg, and cheese cups. They're quick and easy and reheat well.

Servings: 4 (3 PP each)
4 slices Canadian bacon
4 large eggs, lightly beaten
1/4 cup chopped cherry tomatoes
1/4 cup fat free croutons, crumbled
2 tbs shredded reduced fat cheese
1 sprig parsley or chervil

Preheat oven to 350 degrees.

Place 1 slice Canadian bacon in each of four 8-10 ounce custard cups. Pour eggs evenly into cups. Top evenly with chopped tomatoes, croutons, and cheese.

Place cups on a baking sheet and bake until eggs are just set, about 20 minutes. Garnish and serve.
**********************************
TASTE NOTES
These egg cups were not rocket science, but they were delicious and would be lovely at a brunch. I ate leftovers (a quick heat in the microwave) and enjoyed them just as much. While the slice of bacon makes a nice cup, when I make these again for "everyday" consumption, I'll chop the bacon just to make it easier to eat.

Tuesday, April 3, 2012

Five Spice Pork Stir-fry

It's hard to believe that there was a time when five spice powder did not grace my spice drawer. It was one of those tastes that I had to grow up to appreciate. This healthy, one-dish meal comes from my Points Plus Cookbook, which has been getting quite a workout lately.

Serves 4
2 tbs reduced-sodium soy sauce
1 tbs honey
1 tsp cornstarch
3/4 lb pork tenderloin, trimmed and cut into 1/4 X 1-inch-thick strips
3/4 tsp five spice powder
1/4 tsp salt
3 tsp canola oil (I used peanut oil)
1/4 lb sugar snap peas, trimmed
1 red bell pepper, cut into 1 inch pieces
1 tbs peeled, grated ginger
2 garlic cloves, minced
3/4 lb baby spinach
1 tsp toasted sesame seeds
1 jalapeno pepper, seeded and minced (I left this out)

Stir together the soy sauce, honey, and cornstarch until smooth; set aside.

Sprinkle pork with 1/2 tsp five spice powder and the salt. Heat large nonstick skillet or wok over medium high heat and add 2 tsp of the oil. Add the pork in one layer and cook until browned on both sides (about 2 minutes per side). Transfer to a plate. Add the remaining tsp oil and add peas, pepper, ginger, garlic, and remaining 1/4 tsp five spice powder (and jalapeno, if you so desire). Stir-fry until the vegetables are crisp tender, about 2-4 minutes.

Add reserved pork and soy sauce mixture and stir-fry until sauce is slightly thickened, about 1 minute. Add spinach and stir-fry until it begins to wilt, about 1 minute. Sprinkle with sesame seeds. Serve over brown rice, if desired.

N.I. (without the rice) per serving:  212 calories, 6 g fat, 20 g carb, 6 g fiber, 21 g prot; 5 points plus
*******************************************
TASTE NOTES
First of all, I found the toasted sesame seeds in the microwave after we finished eating, so they don't appear in the photo. This stir-fry was as tasty as it was photogenic. In fact, we enjoyed it so much that I am making it again next week. The 1-cup serving was very filling with 2/3 cup brown rice. This is a fragrant dish, mostly due to the five spice powder. If you've never used this spice before, I predict it will become a favorite very quickly.

Tuesday, March 27, 2012

One Bowl Chocolate Cake


This is the King (or Queen) of chocolate cakes and the one that DSO requests every year for his birthday. I've never posted about it before because he brings it to work and I don't have a chance to get a photo of a delicious slice. Understand that as pedestrian as the photo of the whole cake looks, it's in the tasting that the magic happens. That this cake is so easy to make doesn't hurt either.

Cake:
2 cups sugar
3/4 cup cocoa powder
1 3/4 cups all purpose flour
1 1/2 tsp baking powder
1 1/2 tsp baking soda
1 tsp salt
2 eggs
1 cup milk
1/2 cup vegetable oil
2 tsp vanilla extract
1 cup boiling water

Preheat oven to 350 degrees. Grease and flour two nine-inch round pans. In a large bowl, stir together the sugar, flour, cocoa, baking powder, baking soda, and salt. Add the eggs, milk, oil, and vanilla and mix for 2 minutes on medium speed. Stir in the boiling water--batter will be thin. Pour into prepared pans. Bake 30-35 minutes in the preheated oven. Cool in the pans for 10 minutes, then remove to a wire rack and cool completely.

Frosting:

(3 tbs raspberry preserves, microwaved 25 seconds--used to seal cakes)

1/2 cup butter
1/4 cup shortening
1/3 cup unsweetened cocoa powder
2 cups confectioners' sugar
2 tbs milk
1 (11.75 oz) jar hot fudge sauce
1 tsp vanilla extract

Cream together the butter and shortening. Sift the cocoa with the confectioners' sugar and add to the creamed mixture. Mix together, adding a little milk at a time to keep the mixture smooth. Add the hot fudge topping and the vanilla and beat until smooth.

Place one layer on a baker's circle. Brush all over with the warmed preserves. Frost. Place second layer on top, brush with warmed preserves and frost.

16 incredibly delicious servings
**********************************************
TASTE NOTES
The first time I made this cake I was skeptical because the batter is so thin. The cakes are incredibly moist and chocolatey. The raspberry preserves seals the crumbs and adds a delicious counterpart to all that wonderful chocolate. I'm betting if you try this, it will become the most-requested cake you bake.

Tuesday, March 20, 2012

Tomato Basil Soup


A local bakery serves a wonderful tomato basil soup on Mondays. The problem is the bakery is a landmine for a weight watcher, so I was delighted to find a recipe for tomato basil soup in Cooking Light magazine. I hoped the soup would be similar in taste to the bakery's version, but it surpassed it in taste. That it takes no time at all to put together is an added bonus.


Serves 4 (10 points plus; 312 cal.; 13.9 g fat; 13.2 g prot; 33.8 g carb ;3.4 g fiber)
1 tbs olive oil
1 1/2 cups chopped onion (1 medium onion)
3 cloves garlic, chopped
3/4 cup fresh basil leaves, chopped
28 oz can fire-roasted, diced tomatoes, undrained
1/2 cup (4 oz) Neufchatel cheese (or 1/3 less fat cream cheese)
2 cups 1% low fat milk
1/4 tsp salt
1/4 tsp pepper
12 (1/2 inch) slices French bread
cooking spray
1 garlic clove, halved
1 oz shredded Asiago cheese

Preheat broiler to high
Heat olive oil in a pot over medium high heat. Add onion and saute for 3 minutes. Add garlic and saute for 1 minute. Add basil and tomatoes and bring to a boil. Stir in cream cheese until melted. Use an immersion blender or place mixture in a blender and blend until smooth. Return to pot, stir in milk, and slowly heat to desired temperature. Do not boil.

Place bread slices on baking sheet. Lightly coat with spray and rub garlic over bread. Divide cheese among slices and broil until bubbly. Serve with the soup.
*****************************
TASTE NOTES
Thick and creamy, sweet and savory in every sip, this may be the perfect tomato soup. While I could have eaten an entire loaf of French bread with melted Asiago on top, the 3 slices and bowl of soup along with a salad was the perfect dinner. This will become a go-to recipe for sure. Next time I'll make it with a cheese panini.

Tuesday, March 13, 2012

Not Your Mama's Chicken Cacciatore


My mother was an incredible cook, but nothing could get me to eat her chicken cacciatore--or anyone else's, for that matter. Just looking at a piece of chicken with skin on and tomato sauce on top of it made me weak in the knees. Add to that the fact that mom put peas in her cacciatore and there was no way in hell that it was ever going to pass my lips.

In more recent years, I have eaten a version of chicken cacciatore made with boneless, skinless breasts, but it was only because I was watching my weight and this enabled me to eat at an Italian restaurant without using my week's worth of calories. But I am a thigh girl, and so when I saw a recipe in this month's Cooking Light for a cacciatore using skinless, on the bone thighs, I had to give it a try. Here is the recipe I used, adapted somewhat for my taste.

Serves 4
8 bone in chicken thighs, skinned (about 2 1/2 lbs)
salt and pepper
2 tbs olive oil, divided
1 medium red bell pepper, chopped
1/2 medium green pepper, chopped
1/2 cup celery, chopped (2-3 stalks)
1 cup onion, chopped
2 tsp chopped fresh rosemary
4 garlic cloves, minced
8 oz sliced mushrooms
1 1/3 cups lower-sodium marinara sauce
1 oz Parmigiano-Reggiano cheese, grated

Preheat the oven to 375 degrees.

Heat a large, nonstick skillet over medium high heat. Sprinkle thighs with salt and pepper. Add 2 tsp oil to pan and swirl to coat. Add 4 chicken thighs to pan and cook for 4 minutes on each side or until browned. Remove chicken from pan, add 2 more teaspoons of oil and repeat.

Add remaining 2 tsp of oil to pan and swirl to coat. Add peppers, onions, celery, rosemary, garlic, and 1/4 tsp salt and cook about 5 minutes, stirring frequently. Add mushrooms and cook 8 minutes more, stirring occasionally. Add marinara sauce and cook 1 more minute.

Spread vegetable mixture in bottom of a 9 X 13 inch glass or ceramic baking dish. Nestle thighs on top of mixture and bake for 30 minutes (until thermometer inserted into chicken registers 160 degrees). Sprinkle with cheese. To round out the meal, serve atop 1/2 cup of penne rigate.

****************************************
TASTE NOTES
This was a delicious dinner that came together very quickly. I did all the chopping earlier in the day which made it a cinch to put together and cook in under 45 minutes. The sauce was very abundant and sweet from the combination of peppers and onions (since I made just 4 thighs, I have sauce left over for another dinner). I will make this dinner again and soon. It was filling, healthy, and came in at 11 points plus (plus 2 more for 1/2 cup of pasta).
N.I.  (without pasta):  352 cal; 15.5 g fat; 32.9 g prot; 36.3 g carb; 3.2 g fiber

Tuesday, March 6, 2012

Philly Cheesesteak


Who doesn't love a crusty roll filled with steak, peppers and onions and mushrooms, and topped off with a flavorful cheese sauce? If you think eating more healthfully means you can't have your Philly cheesesteak and eat it, too, you're wrong. March's issue of Cooking Light was a bonanza of Weight Watcher-friendly meals. I find the recipes in CL far tastier and "real" than those in WW's magazine, which I don't plan to renew my subscription to.

Serves 4
1 (12 oz) flank steak, trimmed
salt and pepper
2 (5 inch) portobello mushroom caps
2 tsp olive oil, divided
1 cup thinly sliced onion
1 1/2 cups thinly sliced green pepper
2 tsp minced garlic
1/2 tsp Worcestershire sauce
1/2 tsp lower-sodium soy sauce
2 tsp all purpose flour
1/2 cup 1% lowfat milk
1 oz provolone cheese, torn into small pieces
2 tbs grated Parmigiano-Reggiano cheese
1/4 tsp dry mustard
4 (3 oz) hoagie rolls, toasted

Place beef in freezer for 15 minutes. Cut beef across the grain into thin slices. Sprinkle with 1/4 tsp each of salt and pepper. Remove and discard brown gills from underside of mushroom caps using a spoon. Remove stems and discard. Thinly slice mushroom caps, then cut slices in half crosswise.

Heat a large nonstick skillet over medium high heat. Add 1 tsp oil and swirl to coat. Add beef to pan and saute 2 minutes or until beef loses its pink color, stirring constantly. Remove beef from pan. Add remaining teaspoon of oil to pan. Add onions; saute 3 minutes. Add mushrooms, peppers, and garlic and saute 6 minutes. Return beef to pan and saute 1 minute. Remove from heat and stir in Worcestershire and soy sauce; keep warm.

Place flour in a small saucepan and gradually add milk, stirring with a whisk until well blended. Bring to a simmer over medium heat and cook 1 minute, until slightly thickened. Remove from heat and add cheeses and mustard, stirring until smooth. Keep warm.

Hollow out top and bottom halves of bread, leavaing a 1/2 inch shell. Divide the beef mixture evenly among bottom halves of hoagies. Drizzle sauce evenly over beef mixture and replace top halves.

N.I. 397 cal; 12.4 g fat; 30.8 g prot; 44.1 g carb; 3.7 g fiber
***********************************************
TASTE NOTES
The last Philly cheesesteak I ate was loaded with grease and grizzle, which I discovered after I ate a few hundred calories worth of cheese. These sandwiches were perfect! As much as I love bread, it's the crust I crave, so hollowing out the hoagies didn't bother me at all. The cheese sauce made a small amount of cheese taste positively sinful. I had to set aside half the recipe since I made this for dinner along with a salad, but I'm looking forward to an "encore" tomorrow night. Another CL hit and for just 10 points plus.

Thursday, March 1, 2012

TAST Week 9: Couching

In embroidery couching is a technique in which yarn or other threads are laid across the surface of the ground fabric and fastened in place with straight or more complex stitches in either the same thread or a different thread. The thread may be the same color or a contrasting color. I've used couching before to attach lace, ribbons, and fancy threads, but have usually used just small stitches or the buttonhole stitch. Here are some examples of couching that I worked onto current projects.


Tuesday, February 28, 2012

Pork with Soft Tacos


I love Mexican food and we have a fabulous Mexican restaurant we both love. Sadly, going out for Mexican food can be the kiss of death if you're trying to lose or maintain your weight. Rather than settling for the occasional treat at our favorite restaurant, I like to prepare more healthful versions of our go-to Mexican meals at home. This recipe, from WW's Dining for Two cookbook, was a real winner with a few small changes. The bonus is it took so little time to prepare and there were no leftovers.

1 tsp olive oil
1 (8 oz) pkg mushooms, sliced or diced
1 small onion, finely chopped
1 small red pepper, seeded and chopped
1/2 lb pork tenderloin, chopped
1/2 tsp salt
1/2 - 1 tsp cumin
1/2 cup your favorite salsa
3 (6 inch) low-fat flour tortillas
1/4 cup shredded pepperjack or Monterey Jack cheese

Heat the oil in a large, nonstick skillet over high heat. Add the mushrooms, onions, and red pepper and cook until tender, about 6 minutes. Transfer to a bowl.

Sprinkle the pork with salt and cumin and cook over high heat, stirring until the pork is browned, about 3 minutes. Stir in the salsa and the mushroom mixture and cook until heated through, about 2 minutes. Transfer to a bowl and wipe the skillet clean with a paper towel.

Spray the skillet with nonstick spray and set over medium heat. Cook tortillas, one at a time, just until golden on the bottom, about 1 1/2 minutes.

Place the tortillas, toasted side up, on a work surface. Spread the pork mixture over half of each tortilla and sprinkle each with one-third the cheese. Fold the unfilled tortilla over the filled half.


Spray the skillet with nonstick spray and set over medium heat. Add the tacos to the skillet and cook, turning once with a large spatula, until golden, about 1 minute on each side.

Per serving (1 1/2 tacos): 399 cal, 14g fat, 32g carb, 37g prot
****************************8
TASTE NOTES
I served these with fat free refried beans and homemade guacamole and had to suppress a few "ole's" during dinner. These were seriously good, filling and flavorful. I'm sure you could substitute chicken, shrimp, or even tofu for the pork and have an equally delicious treat. Next time, a Skinny Girl margarita will be my garnish.