
Sunday, February 27, 2011
MEET MOLLY BLOOM
Friday, February 25, 2011
SHIN BEEF

I'm still in pursuit of a beef vegetable soup like the one my mother used to make, so when I saw shin beef in the supermarket, I picked up a few packages. What I really liked about my mother's dish was not the soup, but what she did with the extra meat she made. She'd fry it up with peppers and onions and it made incredible sandwiches. Given that my last attempt did not produce the desired results, I decided to just cook the shin beef, low and slow, and see if the meat tasted like what I remembered. On eHOW, I found some good information on what shin beef is and how best to cook it. I adapted their directions slightly.
First of all, shin beef is from the lower front leg of beef cattle and is sometimes referenced as beef shank. Because shin beef is taken from well-developed muscle that has a high percentage of connective tissue, it is extremely tough. However, if braised slowly with aromatic vegetables and herbs, shin beef makes a delicious and economical meal.
Ingredients
3-4 lbs. shin beef, including bone
4 tbs. olive oil
sea salt and freshly ground pepper
2 tbs. flour
2 bay leaves
2 springs of rosemary
3 cloves chopped garlic
1 medium chopped onion o
2 celery stalks chopped
3 chopped carrots
1 28-oz. can crushed tomatoes
2 tbs. tomato paste
1/2 cup red wine
2 cups beef borth
2 tbs. chopped Italian parsley, for garnish
Season the meat with salt and pepper, sprinkle with flour. Heat 2 tbs. oil in a Dutch oven until it begins to shimmer. Then add the meat and saute until it's brown on all sides.Work in batches so the pan is not overcrowded. Remove the browned meat to a bowl.
Heat the remaining 2 tbs. of olive oil in the Dutch oven and saute the chopped vegetables and the herbs until the vegetables begin to turn translucent and tender. Once the vegetables begin to soften, scrape the contents of the skillet into the bowl with the beef.
Return the Dutch oven to the stove and deglaze the pan with the red wine, scrapping the bottom of the pan to dissolve the brown bits. Add the tomato paste and reduce for one minute. Add the beef broth, tomatoes, beef and vegetablesand bring to a boil.
Preheat the oven to 300 degrees.
Put the covered pot in the oven for three hours. Remove the meat and vegetables from the pot; discard the bones; and place the Dutch oven over a medium flame and reduce the pot liquid; then pour it over the meat. Garnish with chopped parsley and serve.
**********************************
TASTE NOTES
Tuesday, February 22, 2011
ROASTED CABBAGE WEDGES

(from The Best of America's Test Kitchen)
Do you shy away from making cabbage because it leaves your home less-than-fragrant for the next few days? I have the perfect solution and it produces a fantastic side dish with very little fuss.
Serves 4-6
1 large head of cabbage
1 tsp salt
1 tsp sugar
freshly ground pepper
2 tbs olive oil
Balsamic vinegar
Preheat the oven to 450 degrees.Cut the cabbage through the core into 4 quarters. Slice each quarter into 4 wedges. Lay out the wedges on a rimmed baking sheet. Brush with the olive oil. Mix the salt, sugar, and pepper together and sprinkle over the wedges. Roast until lightly browned on the edges, about 25 minutes. Drizzle with the Balsamic vinegar and serve at once.
******************************
TASTE NOTES
It should have occurred to me before to try roasting cabbage. Thanks to Ina Garten I roast nearly every vegetable we like. The roasting did not produce that awful cabbage stench that boiling creates. It also resulted in very sweet, very tender cabbage. Served alongside some turkey kielbasa, it was the perfect accompaniment.
Friday, February 18, 2011
PEANUT BUTTER AND JELLY MUFFINS

Seldom does a day go by without my checking out what's cooking on my favorite blog sites. I try to visit a couple of new blogs each week, but find myself returning to a few favorites time and again. Mennonite Girls Can Cook is one of my favorites because most of the recipes there are what real people eat most of the time. I almost always have the ingredients called for on hand. In the case of these muffins, I literally grabbed my laptop, perched it on the kitchen counter, and had the muffins in the oven less than a half hour after I'd read the post. My only change was that I used jelly and not jam. It was not a deliberate choice. I wanted to use grape since that's DSO's favorite and I had sugar free grape jelly, not jam (DSO is diabetic, so I try to lighten up any sweets). I'm sure the jam would have held up better, but the jelly worked well enough. Be sure to check out what's cooking in the Mennonite girls' kitchens.
Ingredients:
- 1 cup whole wheat flour
- 3/4 cup white flour
- 1/2 cup brown sugar
- 3 teaspoons baking powder
- 1/2 teaspoon salt
- 1 1/4 cups milk, I used skim
- 1 egg
- 1/3 cup peanut butter
- 2 tablespoons butter, melted
- 1 teaspoon vanilla
- Jam

- In a bowl whisk together dry ingredients.
- In another bowl mix the rest of the ingredients except for the jam and add to the dry ingredients and mix just until moistened.
- Spoon half of the mixture into a greased muffin pan.
- Spoon 1 teaspoon jam into each muffin cup and spoon the remaining batter over the jam to cover.
- Bake at 400º for 25 minutes.
- Cool a few minutes in the pan, remove and cool completely on a cooling rack.
- These muffins freeze well.
Yields: 12 muffins
********************************************************
TASTE NOTES
You're going to love these muffins. There's no mistaking the peanut butter flavor and they're moist and just the right size to ward off guilt. Delicious with a cup of tea, they're irresistible with a glass of cold milk. I can attest to the fact that they freeze well, which is a bonus if you want to control your snacking.
Tuesday, February 15, 2011
PASTA ALLA PASTORA


It's only natural that most of my Italian-inspired cooking hails from the region of Campania which is in the province of Naples. My mother's family hails from that southern Italian region, though both her parents were born in the United States. My father's parents, on the other hand, were born in the region of Calabria though, sadly, I do not know the exact place of their birth. I've just begun trying to construct a family tree, using Ancestry.com. So when I happened upon a cookbook entitled My Calabria by Rosetta Costantino, I knew I had to add it to my collection. As much an armchair travel book as a cookbook, it's been on my lamp table for several weeks now. My paternal grandmother died when I was about 3 years old, so I remember very little about her except my mother's stories of her wonderful homemade bread and pizza. I know, as well, that she raised and butchered her own chickens, kept an extensive vegetable garden, and was a wonderful stitcher--perhaps my love for embroidery has its origins there.
I chose to begin my introduction to this other side of my heritage with a simple pasta dish--pasta alla pastora, which is a shepherd's-style rigatoni with ricotta and sausage. A humble dish, it uses ingredients that a Calabrian shepherd would have on hand: fresh ricotta and a bit of sausage.
Serves 6 - 8
3/4 lb fresh sweet or hot Italian sausage
2 tbs extra virgin olive oil
1 lb homemade ricotta (or good quality, whole milk ricotta)
Kosher salt and freshly ground pepper
1 lb rigatoni or penne
freshly grated pecorino cheese
red pepper flakes, optional
Remove the sausage casings. Heat the olive oil in a deep skillet over medium heat. Add the sausage meat, breaking it into small clumps about the size of an olive. Cook until browned all over; keep warm.
Press the homemade ricotta through a sieve. Or, place the store-bought ricotta in a bowl. Add salt and pepper to taste.
Bring 5 quarts of water to a rapid boil. Add 1/4 cup Kosher salt, then add the pasta and cook to the al dente stage (10-13 minutes, depending on the shape used). Just before the pasta is done, add 3-5 tbs of the pasta water to the ricotta to warm it and make it creamy and sauce-like. Set aside another 1/2-3/4 cup of the pasta water, then drain the pasta and add it to the skillet with the sausage. Toss over high heat until it's hot throughout, then add to the bowl with the ricotta. Add some pasta water and toss until the pasta is coated with the sauce. Add the pecorino and serve immediately.
**********************************
TASTE NOTES
Let me start by saying I'm not a big fan of ricotta. However, in this dish, it is ethereal. This simple to make dish was incredibly satisfying. I could have eaten half the bowl, but exercised restraint. There was just enough fat in the dish between the olive oil and the sausage renderings to transform the ricotta into a silken sauce. You do need that pasta water to thin the sauce. Because there are just 2 of us (and lots of leftovers), I saved a jar of the pasta water. I'll heat it and add it to the pasta before reheating it. While I'm sure it won't be as lovely as it was when freshly made, I'm looking forward to those leftovers already. Do try this. It sounds way too simple to be so wonderful, but I promise you it is. I would serve this to guests in a heartbeat.
Friday, February 11, 2011
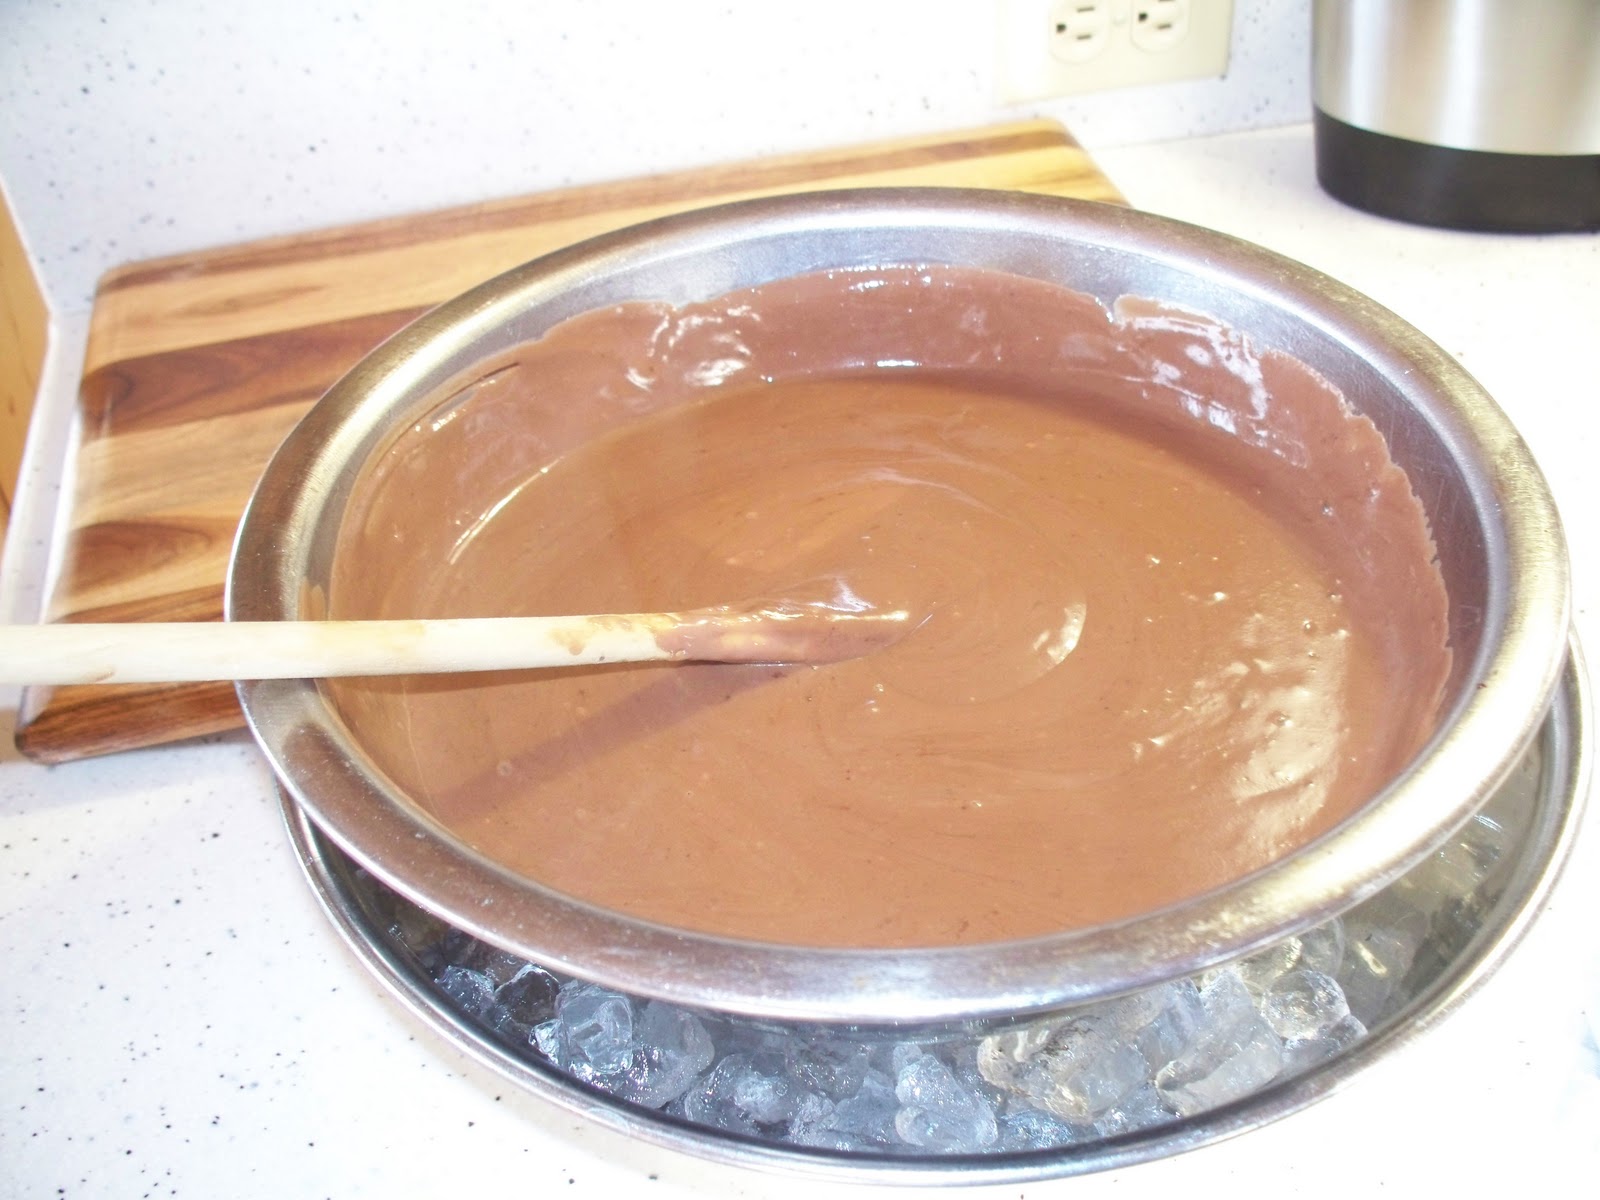
HOMEMADE CHOCOLATE PUDDING

Old habits die hard and even though I've been retired almost 7 years, I still love a snow day. When I checked the fridge for WW approved, low carb snacks, I realized we were out of DSO's favorite Jello mousse. Having a whole day before me with no "must do's," I decided to find a recipe for a lightened chocolate pudding. I found a likely candidate on the Cooking Light website.
Yield: 6 servings (serving size: 3/4 cup)
 Ingredients
- 1/2 cup granulated sugar
- 1/3 cup unsweetened cocoa
- 3 tablespoons cornstarch
- 3 tablespoons dark brown sugar
- 1/8 teaspoon salt
- 4 cups 2% reduced-fat milk
- 3 large egg yolks, lightly beaten
- 2 ounces bittersweet chocolate, chopped
- 1 teaspoon vanilla extract
Preparation
Combine first 5 ingredients in a large saucepan. Gradually add milk, stirring with a whisk. Bring to a boil over medium heat, stirring constantly. Cook 1 minute, stirring constantly.
Place egg yolks in a bowl. Gradually add hot milk mixture to egg yolks, stirring constantly. Return milk mixture to pan. Cook over medium heat 5 minutes or until mixture is thick, stirring constantly. Remove mixture from heat, and add chopped chocolate and vanilla extract, stirring until the chocolate melts. Spoon pudding into a small bowl. Place bowl in a large ice-filled bowl for 15 minutes or until pudding is cool, stirring occasionally. Remove bowl from ice; cover and chill.

TASTE NOTES
This was just a bit more complicated than making a boxed chocolate pudding, but the results were oh, so much better. While I wouldn't consider this low carb (43 g) or an everyday treat (8 WW pts), it was a lovely, comforting bowl of chocolatey goodness. Many people have never tasted real pudding and don't realize how different it tastes from pudding cups or instant pudding. Next time you have a snow day, try it.
Tuesday, February 8, 2011
TAGLIATELLE WITH BRAISED SHORT RIBS

Serves 4 - 6
4 lbs beef short ribs
Kosher salt and freshly ground pepper
1/8 cup olive oil (I halved Giada's recommendation)
1 large onion, diced
3 cloves garlic, coarsely chopped
1 can San Marzano tomatoes, liquid drained, chopped
1 cup red wine (I used a Sangiovese)
3 tbs Dijon mustard
2 cups low-sodium beef broth
1 lb tagliatelle (I just love this pasta, though I'm sure Giada's tasted great with penne)
1/4 cup freshly grated pecorino romano (I'm not into parmesan)
1/4 cup chopped fresh parsley (optional)
Place an oven rack in lower third of the oven and preheat oven to 350 degrees.
Season the ribs with salt and pepper. In a large, heavy-bottomed Dutch oven, heat the oil over medium-high heat. In batches, add the ribs and brown on all sides, 8-10 minutes. Remove the ribs and set aside. Add the onion and garlic and cook, stirring frequently, for 2 minutes. Add the tomatoes, wine, and mustard. Bring the mixture to a boil and scrape up the brown bits that cling to the bottom of the pan with a wooden spoon. DO NOT SKIP THIS STEP; IT'S THE MONEYMAKER. Return the ribs to the pan and add the beef broth. Cover the pan and place in the oven for 2 1/2 hours, until the meat is so tender it falls from the bone.
Remove the ribs from the cooking liquid. Using a large spoon or a gravy separator, remove excess fat from the sauce. There will be lots of fat. An alternative is to make the dish the day before, refrigerate the sauce separately, and lift off the congealed fat. However you do it, you want to be sure to remove the fat. Giada glides over this step, but the sauce would be way too greasy otherwise. Transfer the liquid to the bowl of a food processor or use an immersion blender to process until the mixture is smooth. Pour the sauce into a saucepan and keep warm over low heat.
Remove the meat from the bones and use two forks to shred it into small pieces. Stir the shredded meat into the sauce and season to taste.
Bring a large pot of salted water to a vigorous boil. Add the pasta and cook to the al dente stage. Drain the pasta and place in a large bowl. Use a slotted spoon to remove the meat from the sauce and add to the pasta. Pour 1 cup of sauce over the pasta and toss well. Use additional sauce as you like. Be sure to top with the grated cheese before serving.
***********************
TASTE NOTES
Pictures may be worth a thousand words, but no pictures can do justice to this dish. Someone eavesdropping on our dinner conversation would have thought we were in the throes of passion...and we were. We were passionately devouring the incredible meat and sauce. The meat literally fell away from the bones on its own. The reduced sauce held the sweetness of the tomatoes juxtaposed against the brine of the mustard and the acidity of the wine. Leftovers were as delicious over mashed potatoes as they were over the tagliatelle. This is not my revered CIA recipe, but it is every bit as good, just different. The prep time is minimal, but the low and slow in the oven filled the house with the most savoury aromas. We were almost foaming at the mouth in anticipation and we were not disappointed. If I could have just 3 meals to eat for the rest of my life, this would be one of them.
I'm sending this to I Heart Cooking Clubs for their "That's Amore" dish because we both loved the dish and want to share the love. So head on over to see what you can add to this meal to put it over the top.
Friday, February 4, 2011
BAKED TORTELLINI WITH BACON

How would you like to put a restaurant-quality dinner on the table in about 20 minutes? Oh, and it has bacon and cheese in it, just in case ease of preparation and quality didn't get you hooked. I tore this recipe out of an Everyday Food a few months back and finally got around to making it. It will definitely have a place on our pasta rotation.
Serves 6
4 slices bacon, sliced crosswise into 1/2 inch pieces (I skipped the slicing and cooked then crumbled the bacon)
1 small white onion, diced medium
1 garlic clove, minced
Kosher salt and freshly ground pepper to taste
1 tbs all-purpose flour
2 cups whole milk
2 pkg. (about 9 oz each) fresh cheese tortellini
1/2 cup grated Parmesan (1 oz)
Heat broiler with rack in top position. In a saute pan, cook bacon over medium heat until browned and crisp. Transfer to a paper towel to drain. Add onion and garlic to the drippings, season with salt and pepper, and cook until onion is soft (about 7 minutes). Add flour and cook, stirring, about 30 seconds.
Slowly add milk, whisking constantly. Add the tortellini and bring to a boil over medium-high heat, stirring occasionally. Reduce to a simmer and cook, stirring often, until sauce thickens, about 4 minutes.
Remove from heat, stir in bacon and half the Parmesan. Transfer to a 2-quart broiler proof baking dish that has been sprayed with nonstick spray. Top with the remaining cheese and broil until golden brown, about 4 minutes.
****************************************
TASTE NOTES
I cut this recipe in half, using a 9 oz package of Buitoni 3-cheese tortellini. DSO and I split this, so we served 2 generously instead of the recommended 3 (it was the weekend, what can I say). I used individual casserole dishes that were broiler proof. By eliminating the slicing of the bacon and using a skillet instead of a saucepan, which the original recipe called for, I further reduced the ease of this recipe. I had no doubt whatsoever that we would both enjoy this baked pasta and it did not disappoint. There was more than enough sauce, but the nutritional data will reveal that it was not an over-the-top indulgence. With all the richness of a creamy white sauce--the sauce coats, there isn't a lot of it--and the wonderful flavor of onions cooked in bacon drippings, DSO and I agreed that we would try this next time with a mushroom or a prosciutto tortelloni. There will definitely BE a next time. The nutritional information is based on the recipe above and 6 servings.
N.I.: 416 cal; 16.3 g fat; 17.1 g protein; 48.5 g carb; 2.2 g fiber
Tuesday, February 1, 2011
PAN-ROASTED PORK LOIN WITH LEEKS
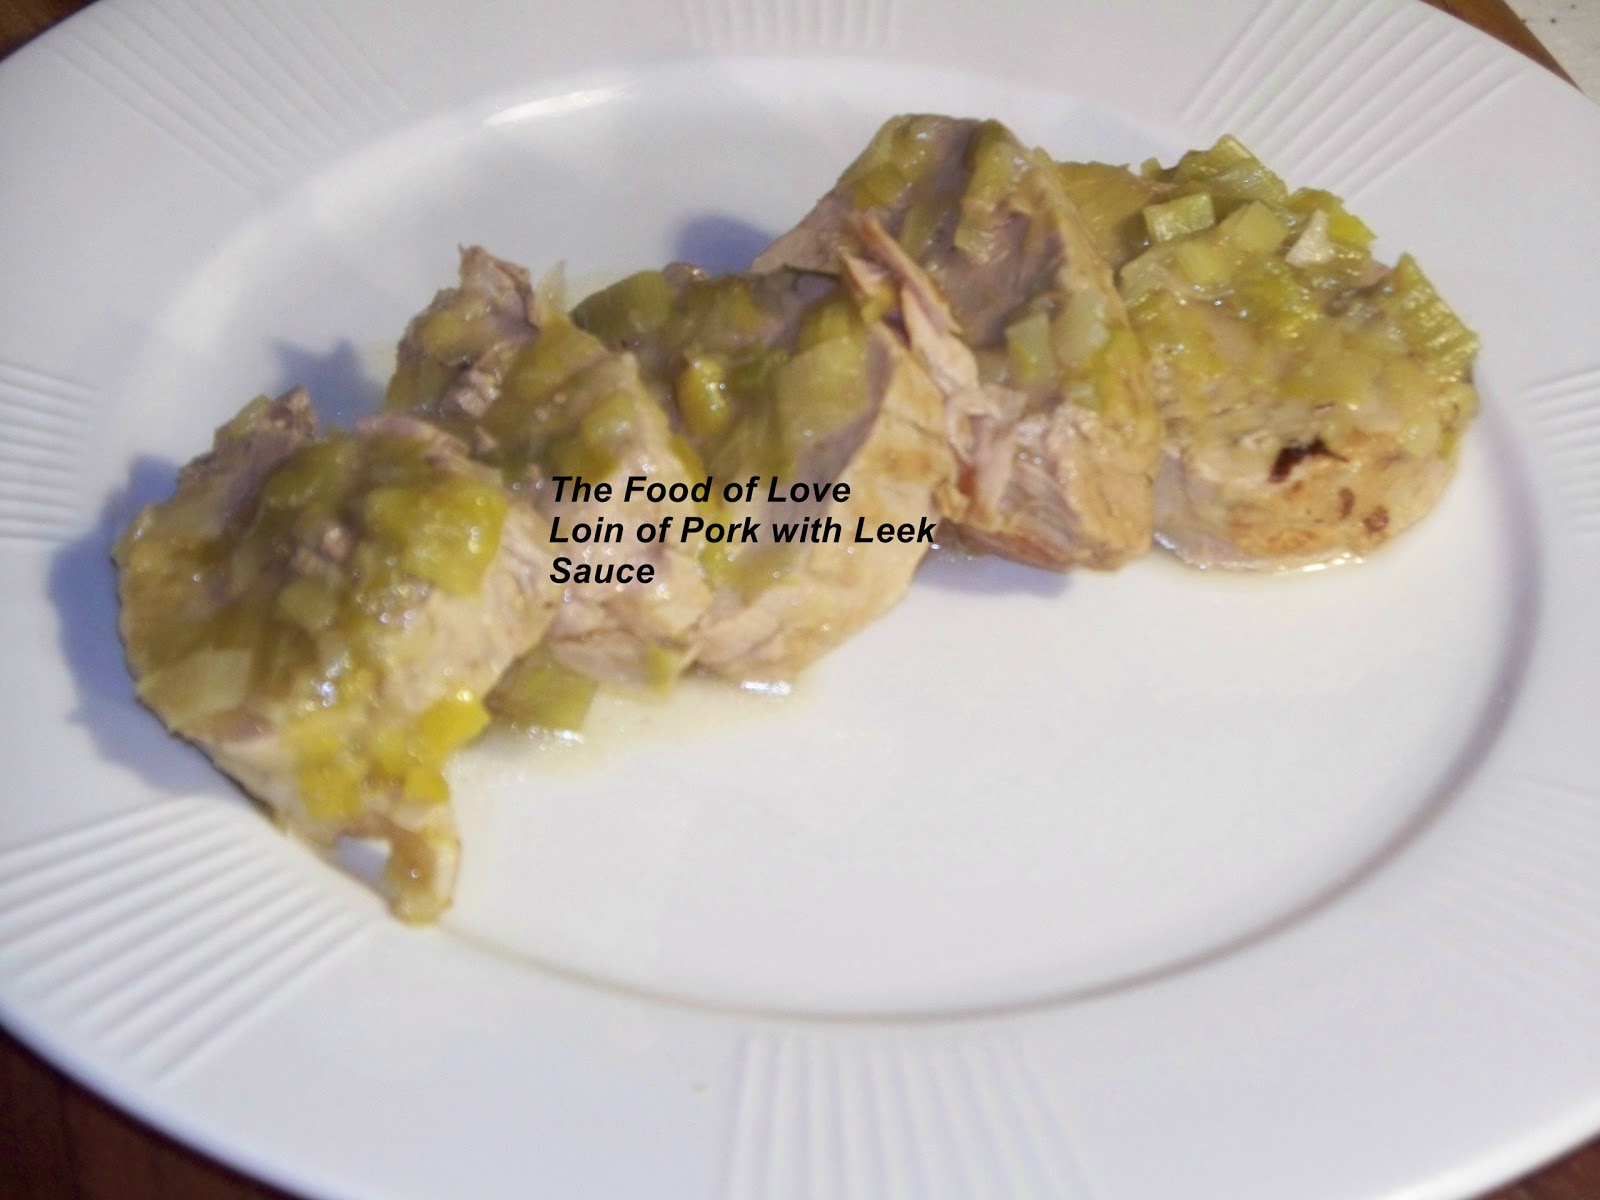
It is my considered opinion that a love of pork products is hard-wired into those of us of Italian descent. Next to chicken, I consider it my go-to protein of choice. Although they are expensive, I love using pork tenderloins. They have virtually no fat on them and, like chicken, are a blank canvas awaiting your artistry in combining just the right spices and accompaniments. Turning again to my now dog-eared copy of Cooking Light's Easy Winter Recipes, this straightforward recipe begged to be made.
4 large leeks (about 2 1/4 lbs)
1/2 cup water
1 tbs butter, divided
1/2 tsp salt, divided
1/2 tsp black pepper, divided
1 (2 lb) boneless pork loin, trimmed (I used 2 - 1 lb tenderloins)
1/2 cup dry white wine
chopped fresh parsley for garnish
Remove roots and tough upper leaves from the leeks. Cut each leek in half lengthwise, then cut each half crosswise into 1/2 inch thick slices (you should have about 6 cups). Soak in cold water to loosen dirt and rinse well.
Combine leeks, 1/2 cup water, 1 tsp butter, 1/4 tsp salt, and 1/4 tsp pepper in a large Dutch oven. Cook for 10 minutes. Pour the leek mixture into a bowl.
Heat remaining 2 tsp butter in pan over medium-high heat. Add pork to pan and cook about 5 minutes, turning to brown on all sides. Add remaining salt and pepper as well as wine to the pan, scraping the pan to loosen up browned bits. Return leek mixture to the pan. Cover, reduce heat, and simmer 1 hour 20 minutes.(original recipe called for 2 hours, but I used the tenderloins and adjusted the time) Remove the pork and increase the heat to reduce the sauce. Cut pork into 1/4 inch slices. Garnish with parsley, if desired.
Yield: 6 servings of 3 oz pork and 2 1/2 tbs leek mixture
N.I.: 246 cal; 10.7 g fat; 24.8 g protein; 1 g fiber; 12.1 g carb; 306 g sodium
*****************************************
TASTE NOTES
Served with maple roasted butternut squash and red cabbage, this was a wonderful dinner on a snowy winter's evening. We never missed the fat in this dish and the leek sauce was simple, but flavorful.
Subscribe to:
Posts (Atom)